Google Play Store Listing Experiments: How to Run Native A/B testing for Android Apps for Free!
Google Play Store Listing Experiments is a built-in A/B testing tool within Google Play Console. This feature allows app publishers and marketers to test for free different versions of their app’s store listing elements - such as icons, screenshots, and descriptions - using actual Google Play traffic.
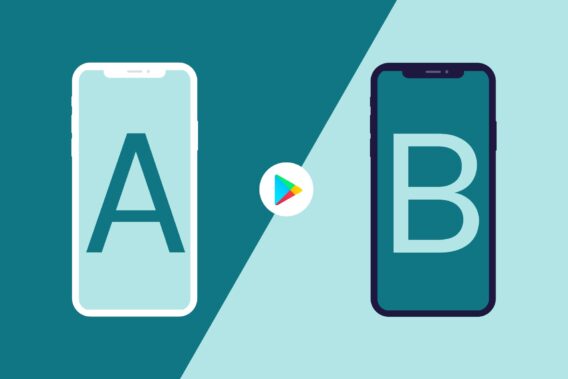
Store Listing Experiments help you discover which creative assets and messages resonate most with your audience, to achieve higher conversion rates and improve your app’s performance in the marketplace.
In this article, you’ll learn the essential concepts – how to set up and run experiments, methods for analyzing results, and best practices for optimizing your app’s visibility and installs using Google Play Store Listing Experiments.
What are Google Play Store Listing Experiments?
Google Play Store Listing Experiments is a tool built right into the Google Play Console that lets you run controlled tests on your app’s store page. In simple terms, it lets you show different images, videos, or descriptions to groups of real store visitors – so you can see what actually convinces more people to tap the “Install” button.
With just a few clicks, you can test versions of your app icon, screenshots, feature graphic, and even the short or full description. After reviewing the performance of each variation, you get clear numbers to guide your decisions.
If you care about making the best first impression, or you want to increase your download rates and grow your user base, Store Listing Experiments let you base changes on real user behavior and not hunches.
What are key elements you can test with Store Listing Experiments?
Key elements you can test with Google Play Store Listing Experiments are the main visuals and descriptions that shape how users see your app. Testing each of these can help you find out exactly what gets more people to install.
- App icon: The official icon your app uses on Google Play – changing it can impact how your app stands out in search and on the store page.
- Feature graphic: The large banner image at the top of your Play Store listing that is meant to highlight your app’s core message or theme.
- App screenshots: Images that show users what your app looks like and provide a visual preview of its features and experience.
- Promo video: An optional video that gives a quick, dynamic preview of your app’s main value or gameplay.
- Short description: The brief text line under your app’s name, explaining your main value proposition in just a sentence or two.
- Full description: The longer, detailed section describing what your app does, who it’s for, and any important features or updates.
All of these elements, except app title, can be tested natively in the Play Console’s Store Listing Experiments. Each test uses real Google Play store traffic, so the insights you get are grounded in actual user behavior.
Quick reminder: Don’t mix Store Listing Experiments with Custom store listings. Custom store listings are used to create a store listing for specific users in the countries you select or if you want to send the users to a unique store listing URL. For instance, if you run paid campaigns or want to target a specific language in a country with multiple official languages (like Switzerland, Canada, Israel, etc.)
How many Store Listing Experiments can you run simultaneously on Google Play?
You can run up to five localized Store Listing Experiments at the same time on Google Play. This means you’re able to test different variations for different languages or regions concurrently. However, there’s a limit: you can only have one main store listing experiment active for your app’s default language at any given moment.
This setup makes it possible to optimize your app’s listing for several key markets in parallel to ensure localized images, descriptions, or videos are a true fit for users around the world. For apps with a global reach, this is a big advantage: you’re able to match your store listing to each market’s preferences without waiting for one test to end before starting another.
Why should you run Store Listing Experiments?
Running Store Listing Experiments helps you find out what really speaks to users on your Play Store page and. It’s the best way to test changes safely, so you don’t just rely on gut feeling or accidentally damage your install rates.
Knowing what works means you can work effectively on your app store optimization (ASO) for Google Play.
The main reasons to use Store Listing Experiments are:
- They can help you increase install conversion rates by highlighting which icons, screenshots, or descriptions actually get more users to tap the install button.
- You can improve retention by attracting users who are genuinely interested in your app, not just those who install and churn quickly.
- Experiments let you discover what messages or visuals work best for each local audience and to fine-tune for different languages or markets.
- You’ll make smarter, data-backed decisions.
- Both small tweaks and major redesigns can be tested in a controlled way, so you can see impact before rolling out changes to everyone.
In other workds, Store Listing Experiments take some of the guesswork out of app marketing and help you grow based on real user behavior.
How do you run Store Llisting Experiments?
You can run Store Listing Experiments in Google Play Console by following a few clear steps. Here’s how it works:
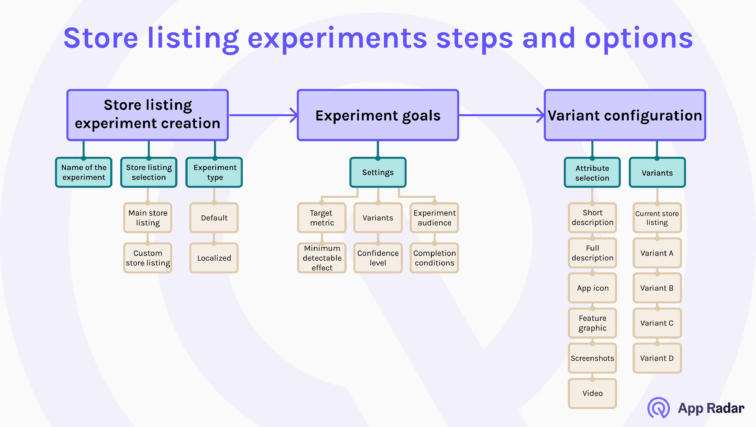
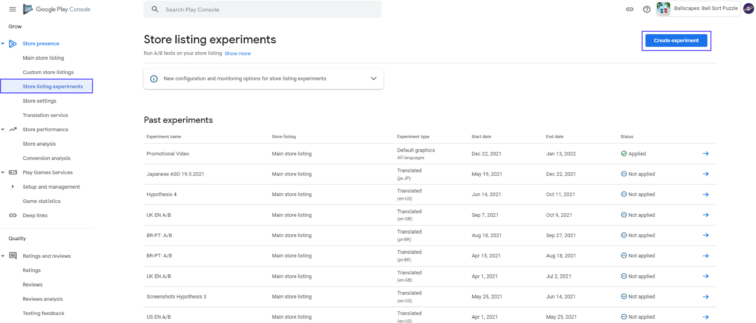
- Go to your app in the Google Play Console and select “Store presence,” then click “Store Listing Experiments.”
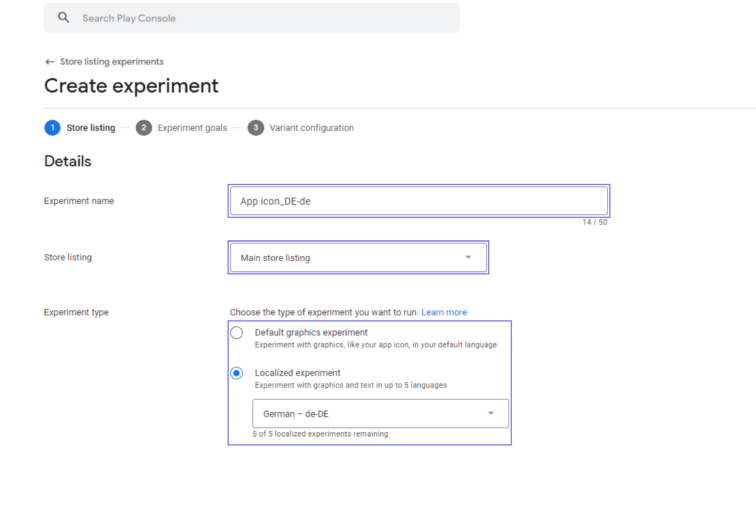
- Click “Create experiment” and give it a clear, descriptive name you’ll recognize later.
- Choose whether you want to run the test on your main store listing or a custom listing (used for special campaigns or languages).
- Select the language or localization for your experiment—you can test up to five localized Store Listing Experiments at once.
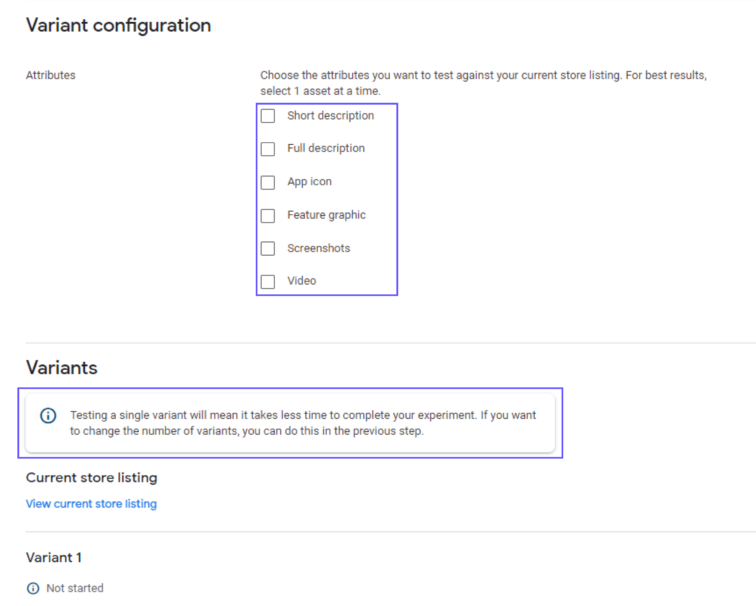
- Pick which attribute you want to experiment with, like app icon, screenshots, or description.
- Create your variants: upload new images or edit text for up to three different versions.
- Decide what percentage of your store traffic will see each version (the rest see the original).
- Set your main metric. For most, “retained first-time installers” is best, as it targets users who keep your app for at least one day.
- Check the estimated number of installs and how long your test should run to reach statistically meaningful results.
Start your experiment, then monitor performance in the Play Console. Make sure to let it run at least seven days to smooth out weekday and weekend traffic.
How do you analyze Store Listing Experiments results?
To analyze your store listing experiment results, focus first on your core outcome metrics and how reliable your results are. Then look deeper at engagement trends and context. Use both Google Play Console data and additional insights to make data-supported decisions.
Check core performance and statistical validity
Start by reviewing your key metrics – first-time installers and retained first-time installers. These numbers tell you if your experiment actually led to more installs, and whether new users are sticking around. Always check the confidence intervals and statistical significance in Play Console results to make sure you’re not just seeing random noise.
If your test variant wins with statistical confidence and matches your business goals, it’s a good sign to proceed with rolling out those changes.
Examine context and deeper signals
Next, look at the bigger picture – think about external trends, campaign activity, or seasonal effects that might have influenced user behavior during your test period. Review Google Play’s recommendations, but always weigh them alongside your knowledge of your app market, customers and experience.
Explore user engagement beyond just install counts. If you have access, check signals like promo video view rates or screenshot interactions. Also, see if the winning variant affected your app’s visibility in organic Play Store search results – a good change of an app description can sometimes lift your ranking, even if installs don’t spike right away.
Segmentat your testing approach for a long-term impact
Break down your test results by geography, device, or acquisition source if possible. Sometimes what works in one region or device doesn’t work everywhere. After applying your changes, keep an eye on KPIs to make sure the improvements hold up over time. Be sure to capture and annotate your experiment findings so your team can build on what you’ve learned.
What are best practices for running Store Listing Experiments?
The best way to get reliable, actionable results from Store Listing Experiments is to plan carefully, test methodically, and keep learning from your data. Here’s how you can do that:
Start with clear goals and a strong hypothesis
Define what you want to improve (like app icon clicks or install rates) and why you think a change will help. A good hypothesis gives every test direction and makes success easy to measure.
Test one element at a time
If you test multiple things at once, it’s hard to know which change really made the difference. Focus on one feature – like your app icon or screenshot, per experiment, for clean results.
Target your audience and market
Run localized experiments to match creative assets or messaging to each region’s language and culture. Google Play allows up to five localized Store Listing Experiments at once, which makes easier to reach your global audience effectively.
Let experiments run long enough
Aim for at least one full week so you cover both weekdays and weekends. Monitor until you’ve collected enough installs for statistical confidence – don’t rush your decisions.
Avoid big external changes during your test
Try to keep ad campaigns and store changes steady while your experiment runs, so your results reflect the tested variant, not outside influences.
Document everything
Track what you’re testing, the variants and your results. This makes it easier to learn from your work and improve future experiments.
Google Play is not the same as App Store
What works on Google Play may not work in the App Store – keep tests separate by platform.
What limitations and challenges come with Store Listing Experiments?
Store Listing Experiments are a valuable tool, but there are some important limits and challenges to consider. Here’s what you should keep in mind when planning and interpreting your tests.
Dealing with general limitations of Store Listing Experiments
There are a few big limitations that you need to consider when evaluating the benefits of Store Listing Experiments:
- organic environment is often unstable – e.g. what happens if your or competitor app gets featured?
- running multiple tests and sticking to testing best practices is time consuming
- results can be inaccurate
- there are no options for control and targeting users
- testing is limited only to your app’s store listing page
- the list of testing elements is limited
- the analytics are limited as well – you can’t get in-depth insights from the default analytics.
Limits on what and how you can test
- Traffic control – you can’t pick specific types of users (for example, traffic only from search or ads). Google Play mixes all your visitors together in experiments. This makes it harder to know which channel is really delivering the results.
- Monetization insights – experiments only measure installs and early retention. They don’t show you data about in-app purchases or revenue from users who see your tested variants.
- Multiple attribute testing – if you try to test more than one element at the same time (like icon and screenshots), you lose clarity about what change made the difference.
Challenges in interpreting results
- Engagement tracking – you can’t track long-term engagement or lifetime value directly through Store Listing Experiments. The focus is only on installs and short-term retention. You might need additional tools and integrations with mobile measurement providers (MMPs).
- False positives – tests with small traffic, short duration, or several variants risk showing a winner that’s not real. Careful checking and follow-up tests help avoid this.
Resource needs
- Experiments require design and time – running meaningful experiments often requires extra design work, new creatives, and enough time to gather data. Bold changes need more upfront effort to produce and review.
Knowing about these limitations lets you plan more effective experiments and be cautious about over-interpreting single test results.
Frequently asked questions about Google Play Store Listing Experiments
Here are some of the most common questions (and straightforward answers) that come up when teams start using Google Play Store Listing Experiments.
Can I test my app name using Store Listing Experiments?
No, Google Play Store Listing Experiments do not allow testing the app name. You can test icons, descriptions, screenshots, videos, and feature graphics, but the app title remains fixed. To test app names, you may need to use external paid tools or run manual campaigns.
How long should I run my Store Listing Experiment?
It’s recommended to run experiments for at least 7 days to capture enough data and cover both weekday and weekend user behavior. Some experiments may need to run longer depending on your traffic volume and the minimum detectable effect you choose.
Can I test multiple languages in one experiment?
Google Play allows you to run up to five localized Store Listing Experiments simultaneously, letting you test different variants for different languages or countries at the same time.
What metrics does Google Play use to evaluate experiments?
Google Play tracks first-time installers and retained first-time installers (meaning users who keep your app installed for at least one day). These are the main ways Play Console measures success in experiments – focusing on installs and short-term retention. This may not work for some app marketers that want to get more in-depth insights.
Is it possible to measure revenue impact through Store Listing Experiments?
No, Store Listing Experiments do not provide revenue or monetization data. They only focus on conversion and retention metrics, so if you want to analyze revenue effects you’ll need to combine results with external analytics tools or follow-up tracking.
Conclusion
Store Listing Experiments use actual Google Play store listing traffic, are free to use, and come with basic retention metrics, such as retained installers after one day. Because you can set confidence levels, detectable effects, split test variants, and easily apply winning combinations, it makes Store Listing Experiments pretty powerful and easy to use.
Although they come with some limitations (absence of engagement metrics, random sampling of traffic sources, and potential false positives), you should embrace this tool and use it as much as possible with your daily Google Play optimizations.
Latest Posts
iOS App Product Page Localization: How to Use it the Right Way to Improve ASO
Top 10 Most Downloaded Games in Google Play Store (July 2025 Update)
12 Best Mobile Measurement Partners (MMPs) to Consider for Your Mobile App Attribution in 2025
Custom Product Pages: How to Boost App Store Conversions With Precise App Store Targeting
Related Posts
