A/B testing in App Store: Full guide to Apple’s Product Page Optimization
In 2021, iOS 15 was launched at the World Wide Development Conference (WWDC) and with it came a handful of new features. One of these was Product Page Optimization (PPO) – a native A/B testing tool to boost app marketing efforts.
Apple’s Product Page Optimization received a lot of noise and was announced as a feature that would change Apple app store optimization. Much talking was about how the PPO feature would improve app marketing strategy and generate more organic growth.
This quick and simple guide to Product Page Optimization will familiarize you with Product Page Optimization and how it works. It will also show you how to test your Apple product page listing to boost conversion rates and find winning combinations.
What is Product Page Optimization in Apple App Store?
Apple Product Page Optimization allows you to optimize your creative assets through native A/B testing for mobile apps. This was a significant step forward in moving away from reliance on external A/B testing tools and aligning closely with the functions offered on Google Play Experiments.
App marketers can run each test to target specific locations for up to 90 days. You can also choose the percentage of your audience that will see your test, allowing you to best allocate your efforts.
This allows you to compare the performance of each of your treatments against your default App Store product page or store listing, providing powerful insights into impressions, downloads and conversion rates. These analytics will empower you with valuable information on the best creatives you can use when promoting your app and which will secure the most conversions.
It is essential to distinguish between the main product page and the Product Page Optimization feature. The main product page is your default app store listing page in App Store that all users see when you are not running any paid campaigns. Once you activate the Product Page Optimization feature, the store listing visitors will see either your default product page or a treatment page (if you are using Product Page Optimization).
What iOS elements can you test with Product Page Optimization?
Through Product Page Optimization, you can test three creative assets using this feature:
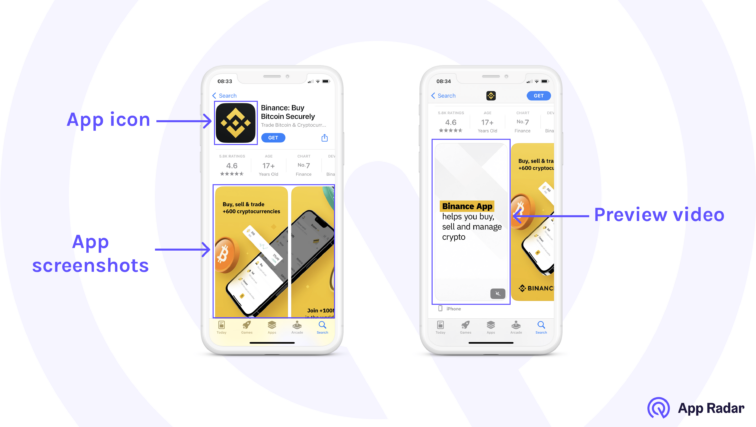
The option is available in App Store Connect to anyone that manages an iOS app. PPOs allow you to create three different variations (treatments) of your default product page. Like A/B testing in Google Play, those treatments are being tested against the original store listing directly in Apple App Store.
Why is A/B testing beneficial for App Store users?
Product Page Optimization is a tool that will help ASO and app experts understand how different page elements influence conversion rates in App Store.
A/B testing and app experimentation have always been limited in App Store. Until recently, app marketers had to rely on external tools or use sequential analyses to check how something performed before and after their test. The closest feature to A/B testing and PPO until iOS 15 was Creative Sets (which got replaced with Custom Product Pages), which required Apple Ads’ usage.
With PPO, app publishers can finally have a free and native tool that uses App Store data and has dedicated analytics.
And similar to A/B testing in Play Store, there are plenty of opportunities and test scenarios:
- Testing new colors and pallets of your assets
- Trying out new messages, screenshot alignments, and styles
- Refining the approach to different localizations
- Pushing new features and checking how they perform
- Trying out videos vs. screenshots
Anything that matters to your potential users and can influence your visitor-to-install conversion rate should be a part of your A/B testing strategy in App Store.
Difference between CPP and PPO
As you already might know, with the launch of iOS 15, Apple also introduced a feature called Custom Product Pages or CPPs. Custom Product Pages allow you to create a copy of your main product page. Without going into too much detail, CPPs allow to create a copy of your main product page, but with different screenshots, preview video and promotional text. Basically, CPPs allow you to have a separate landing page for each of your paid campaigns.
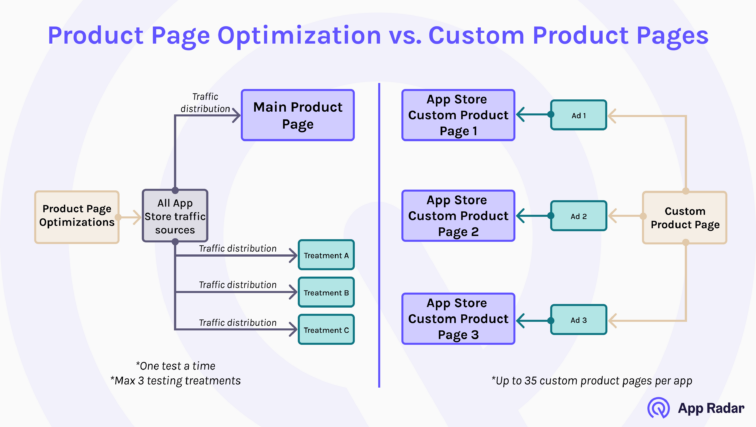
And unlike the Product Page Optimization feature, CPPs allow you to create up to 35 custom pages per app, which provides a whole range of customization opportunities.
Many app marketers also use CPPs to enhance their A/B testing in App Store, but it is essential to note the difference between CPPs and PPOs:
CPP vs. PPO goals
Custom Product Pages improve the conversion rate of user acquisition by customizing the user journey. This typically includes Apple
Apple’s Ads for iOS apps and Facebook Ads.
Product Page Optimization, on the other hand, aims at testing different product page options and layouts to find the best-performing variation of the main product page.
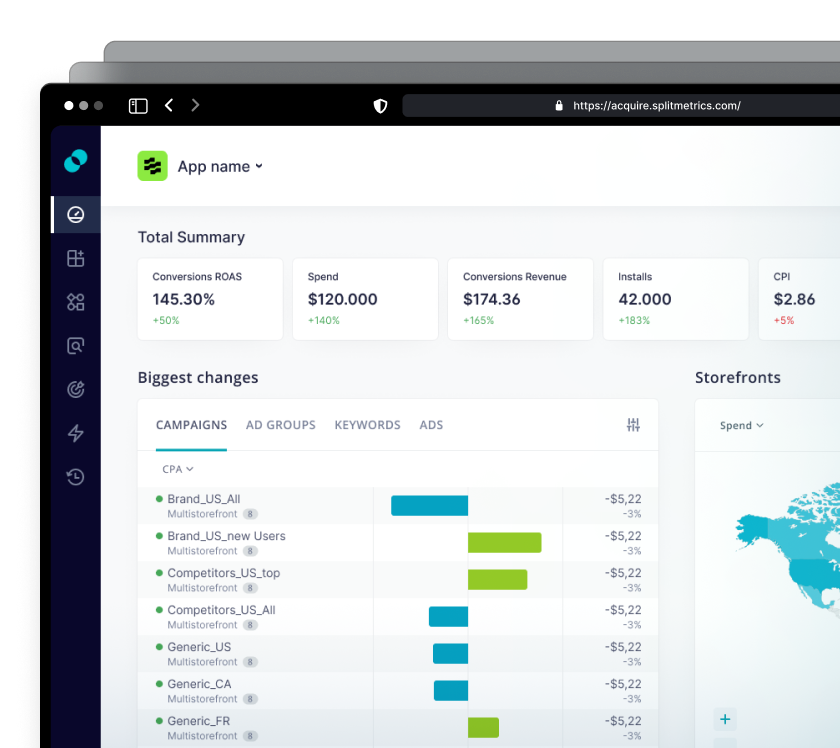
Traffic sources
Custom Product Pages are only reachable via unique URLs and specific traffic sources. CPPs can’t be found organically and are used with paid campaigns.
Product Page Optimization needs one traffic source. All App Store product page visitors are equally split between the main product page and testing variations.
Testing and statistical significance
While CPPs can complement your A/B testing in App Store, they shouldn’t be your primary tool for testing. First, the CPPs are used with paid ads, meaning you might need to pay for the traffic to your custom landing page.
Furthermore, to reach the appropriate level of statistical significance, you should increase the budget and keyword bids, which doesn’t allow you to scale the testing. Even then, you might get worse results and have a wasted budget.
Product Page Optimization use all traffic and are free to use and set up. They provide statistically reliable results and although they come with limitations, they are a much better fit for A/B testing than Custom Product Pages.
Although iOS app publishers should use something other than Custom Product Pages primarily for A/B testing, they overcome some PPO limitations and can provide an additional layer of data.
The testing process in App Store
Apple’s Product Page Optimization follows a similar logic to most A/B testing tools. Let’s have a quick look at the most critical steps.
Test Configuration
Like Google Play’s Store listing experiments, App Store also allows you to choose treatments, traffic proportion between the variants and target localizations.
Apple calculates how long it takes to reach your desired improvement based on the targeted conversion rate improvement you provide and the recent traffic your product page received.
You can have one test at a time that can last a maximum of 90 days, but you can stop it anytime. Once the test goes live, you can’t change it and if you release a new version of the app, it will be stopped automatically.
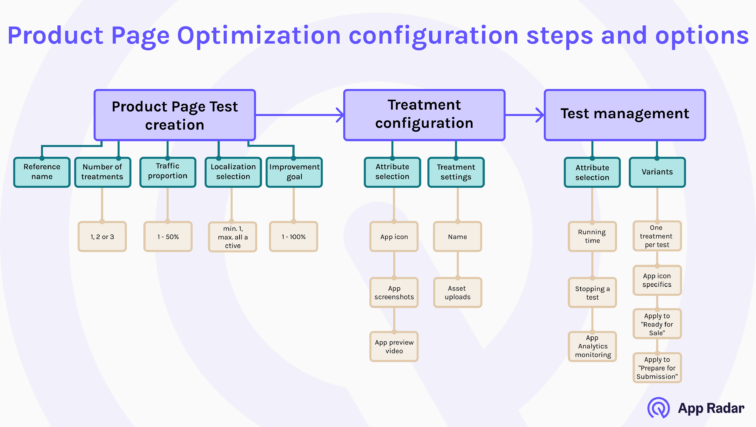
Apple will ask you to provide the following information:
- Reference name for the test
- Number of treatments you will use within the test
- Traffic proportion between the main product page and testing treatments. Like Google Play’s A/B testing, each treatment’s traffic is allocated equally.
- Localizations selection
- Test duration estimation
- Test treatment setup
Monitoring the test performance
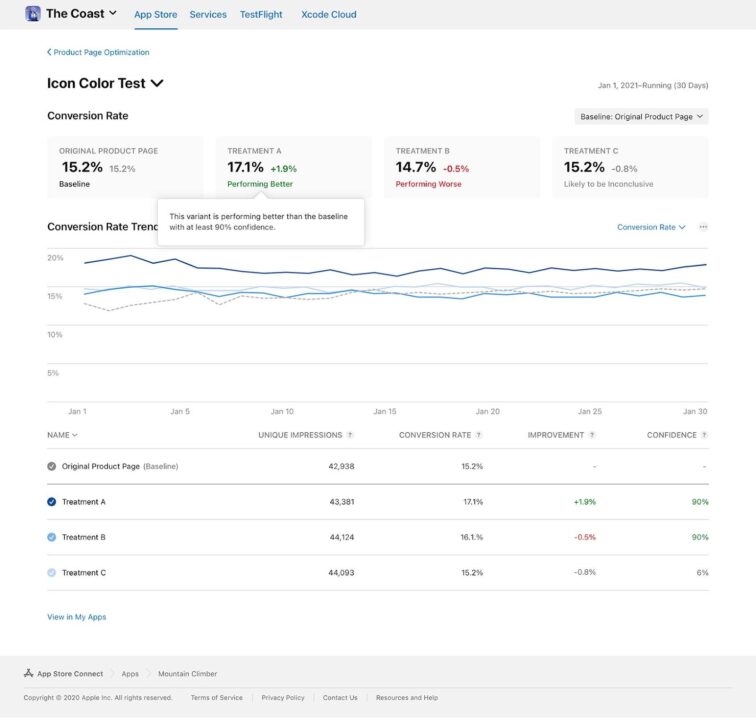
The App Analytics section in App Store Connect will contain the information on the test progress you previously set up. You will be able to check impressions, conversion rate, percentage improvements, and confidence levels compared to the main product page.
If you have multiple testing treatments, you can compare their performance with each other.
App Store will also provide supporting information, such as if the test needs more data to collect and which treatment performs the best.
Applying the winner treatment or staying with the existing version
The last thing you will have to do is decide if you want to stick with the current product page or apply one of the testing treatments. If you apply a treatment, the test will end.
To ensure the treatment variant performed better than your main product page, you should check which option is declared a winner using a 90% confidence interval.
Quick checklist before setting up a test
Preparing for the Product Page Optimization includes the same set of things that you would do when preparing for any other A/B test. Let’s quickly look at them.
- Start with an A/B testing plan – think about what, why and how you will test before creating a real one. This is vital when working on your testing strategy and hypotheses.
- Prioritize your market – Product Page Optimization limits the reporting data (more about that soon), so it is wise to go after one localization at a time.
- Match the user intent with your test – You should explore what keywords usually bring you traffic from App Store research. While App Store doesn’t report those keywords, you can always look at the most popular keywords in your category by using your app store optimization data.
- Test duration is essential – be patient and leave at least seven days to find a better-performing variant.
- Limit outside factors – don’t start a new paid campaign parallel to your Product Page Test. Remember that the test you launch will use all traffic sources, which means that a significant increase in paid ads might skew the results.
- Understand seasonal effects – run a campaign long enough to eliminate seasonal aspects such as holidays, weekends and anything else that might distort the accurate picture.
- Test big and small changes – Small changes are nice and should be a regular part of your ASO strategy. But if you struggle to make big jumps in conversions, include significant changes in your testing strategies. E.g., you can try out redesigned app icons, new fonts in screenshots and more focused videos.
App Radar is our ASO and app marketing tool that provides many useful reports, such as keyword volumes, difficulty, ad keywords and other important information about App Store. Although you can’t use keywords in Product Page Optimization campaigns, knowing why people come to your product page can help you create a better Product Page Test. You can even connect your Google Play Console to App Radar and see the keywords that bring Android installs. Even though Android and iOS users differ, you can still get much value by understanding Google Play data and which keywords bring organic installs.
How to create your first Product Page Optimization
To set up your first Product Page Optimization test, head over to App Store Connect (if you are unfamiliar with App Store Connect and how it works, check out our extensive guide to App Store Connect for mobile app marketers).
Here is the exact list of steps you need to follow to run A/B tests in App Store.
Step 1 - Log in to your App Store Connect account
Go to https://appstoreconnect.apple.com/ and log in with your email password.
Step 2 - Choose your app
Go to the “My Apps” section and choose the app you want to optimize (in case you have multiple apps).
Step 3 - Select the Product Page Optimization option
In the left side menu, navigate to the Features tab and the last option in the column will be “Product Page Optimization” text. Click on the text and a pop menu will appear.
Step 4 - Select your test criteria and create the test
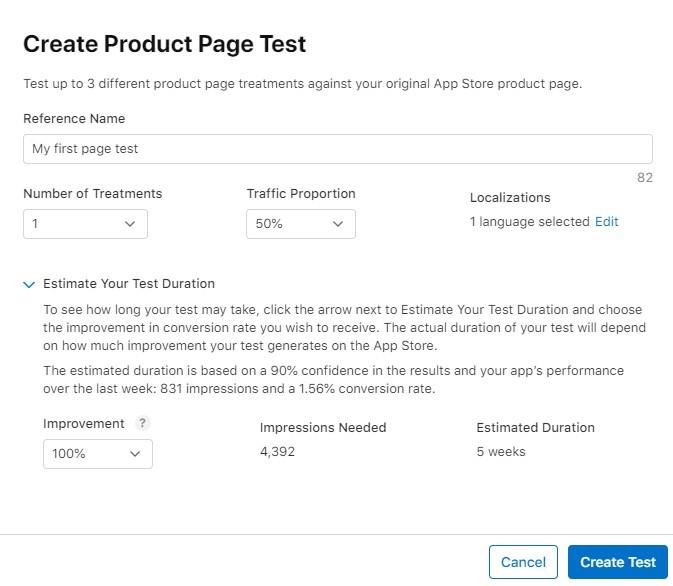
You can name your test and choose the number of treatments, traffic portion, localizations, and improvement percentage. App Store will estimate how much time and how many impressions you need to improve your app for the desired percentage improvement.
Step 5 - Configure test treatments
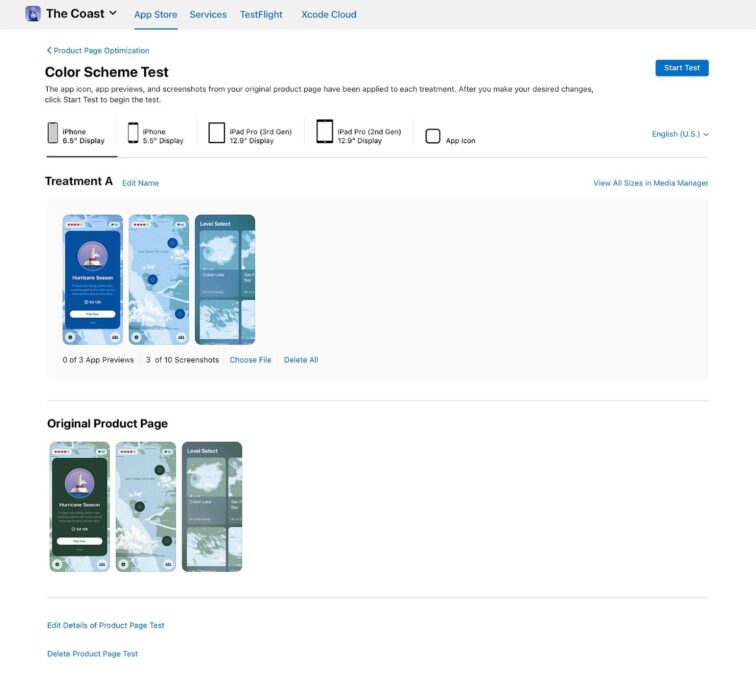
Once you create your test, you will see it under the “Product Page Optimization” tab. When you click on it, you will see each localization’s original and treatment page.
You can test app icons, screenshots and preview videos. However, not all apps will have the option to test app icons. To test app icons, your app binary needs to include more than one icon for the current App Store version. Furthermore, the app must use an SDK that supports alternate icons in asset catalogs.
It is important to note that you don’t have to upload testing assets for each screen size. The treatment version will use your current product page screenshots if you don’t upload all screen sizes.
Step 6 - Run the test
You can run the test when you upload test assets for different localizations and screens. Click on the “Start Test” button in the top right corner and the test will update its status to “Running” and show how long the test has been live.
If your app is in the review process, your test won’t go live before App Store reviews the new app version.
The test will run for 90 days by default, or you can stop it manually at any time.
Step 7 - Monitor the test performance
You can monitor your test progress in the App Analytics section and check impressions, conversion rates, percentage improvements and confidence levels and comparison with your current product page.
Step 8 - Apply your test to the main product page or keep the original version
After looking at the test results, you can apply the treatment that will be visible to all App Store visitors. App Store will share with you its recommendation if a particular treatment performs better or worse than the current product page and if you should or shouldn’t apply the test winner.
Make sure you have at least a 90% confidence score and check if the App Store declares the treatment is performing better or worse than the baseline (your current product page).
If you want to apply the treatment, go back to your test, select the treatment version, click “Apply” and choose the app version to which you wish to apply the treatment.
AB testing limitations in App Store
So far, we have covered most aspects essential for setting up and running your Product Page Tests. If you have been following along, you might have noticed that there are quite a few limitations that Apple needs to address adequately.
We love having another native A/B testing tool in our ASO arsenal. Still, we like the flexibility of Store listing experiments much more and feel that the Product Page Optimization feature still needs much improvement.
For anyone who wants to frequently test App Store elements, new concepts, and metadata and target multiple locations simultaneously, Product Page Optimization will feel limited.
Let’s look at these limitations and why PPOs still require more development.
- Product Page Optimization is limited to one test at a time. You can only run one test and target different localizations. If we know that we need to run a particular test for at least one week and we have a bunch of things we want to test, it will take considerable time to execute all A/B tests.
- Metadata can’t be tested. While testing icons, screenshots and preview videos are nice, it is a pity you can’t test more things. We would like to test at least iOS subtitles and watch how they influence our app visibility.
- There needs to be a way to analyze test results per localization. While you can target multiple localizations with a Product Page Test, you can check how each performed and which localizations performed better. Of course, you can target one localization at a time. However, if you want to test, e.g., app screenshots in German, French and Spanish languages, you will need to run three tests one after another, and they will take at least four weeks to complete (we assume one week per test plus additional days for test submissions).
- You can’t use only one traffic source for testing. PPOs will take all your traffic and distribute it to the main product page and the treatments.
- Every PPO that you run requires approval from the Apple team. While this doesn’t seem critical, we have heard app marketers complain that the approval process can sometimes take even longer than the regular submission of a new app version.
- Complicated app icon testing process. Although you can test app icons, it is a challenging process. Firstly, you need to upload an alternative app icon you want to test to your app binaries for the next release. Secondly, you must wait for the test before releasing the new app version. Thirdly, you need to test this alternative icon and check its performance. Finally, if that icon performs better than your current app icon, you can’t apply it immediately. You will have to build that alternative icon in the following app submission process and make it a default version. In short, the whole app testing process needs careful planning and could take a couple of weeks at a minimum if you want to get it right.
- The treatment variations are served to iOS 15 users only. This will be less of a problem as time passes, mainly because we already have the iOS 16 rolled out. But at the moment, this means that some users could be excluded from your A/B test.
- The confidence scores are limited to 90%. We want to be able to choose our level, just like you can do in Store listing experiments. Especially because the 95% confidence level is an industry standard.
- The experience so far shows that PPOs need a large sample size to be significant. The ideal test duration needs to be 1-2 weeks. Anything less would be too short and more extended tests might be influenced by external factors. While this isn’t an unexpected element, it shows that you need to monitor the tests carefully.
- The test results use an “estimated CVR” metric, which doesn’t provide an additional explanation. This means that you have to rely on a metric that isn’t supported by other data and you can’t understand why something performed better. We have the same issues with Store listing experiments, but nevertheless, we hope that app stores bring some extra data with their metrics and explain what influences them.
- If you find a bug and need to release a new app version unexpectedly, your PPO test will automatically end. If you work with a product team that plans new app submissions every week, it will be almost impossible to run PPOs properly. Product releases will always have a priority and will surely undermine your testing effectiveness.
As you can see, Product Page Optimization is far from a perfect tool and it is vital to understand all these challenges and limitations before investing more time in them.
Nevertheless, PPOs are still valuable and can be used to improve most app businesses. However, the PPOs will be too limiting and time-consuming for anyone who wants to perform App Store testing at scale.
External A/B testing tools
Native A/B testing tools from Apple and Google Play have some limitations. If you want to overcome them, you must use external tools.
External A/B testing tools offer app managers and publishers opportunities to test app elements not available with native A/B testing tools like Product Page Optimization and Google Play Store listing experiments.
For a start, the external tools have additional flexibility – you can set up the traffic distribution, execute multiple tests across different markets and track in-depth how people interact with Store listing pages. If you compete with tough competitors and minor improvements can impact your business, external tools will save you time and give additional insights.
Above all, you can test the things you can’t with native A/B testing tools. This includes all types of creatives and metadata. You also can rely on something other than the app store reviews process – you can launch tests independent of app versions or even without having a live listing in the app stores.
However, external tests also come with some limitations. They use only paid traffic and a “sandbox” environment. The sandbox environment means that once the users click on a paid ad on, e.g., Facebook, they are sent to the artificially created landing page under the test provider’s control. It might feel and look the same as the official app store page, but it is not. However, the test provider can track in-depth how people interact with those artificial pages.
With that in mind, the external tests may differ from the organic user behavior and the paid traffic might come from non-mobile data. The users might navigate to the competing apps, which means you are wasting the potential traffic on users that won’t convert. And those tests tend to be expensive – to get a significant amount of data, you will need to gather a lot of clicks just to test something.
So, external A/B testing tools are also not perfect, but they definitely complement the native A/B tools. Just like with your app store optimization efforts – there is no ideal solution, but combining different tools, approaches and your own experience is what brings results.
If you are looking for external A/B testing tools, check out companies like Splitcube, Splitmetrics, Storemaven and Geeklab.
Best practices for App Store A/B testing
If you have been doing A/B testing for some time, chances are you already have a good understanding of how to approach it and which things to pay attention to.
Nevertheless, let’s summarize the essential aspects and adapt them to the specifics of the App Store.
Don’t make too many changes while performing your tests
Try to make your control group as stable as possible. Although you won’t be able to update metadata without stopping your PPO test, keep the paid campaigns steady so you don’t change the traffic sources too much.
Know what you are testing
Always pay attention to what you are going to test and why. And especially in App Store, be aware of the limitations we already discussed before.
Use Custom Product Pages additionally if you want to get organic traffic for your tests
We have mentioned that Custom Product Pages can complement your A/B testing in App Store. If you want to test organic traffic only, you can set up your CPPs so that all your paid traffic goes to them. This will leave your tests with organic search and browse traffic. Using CPPs in combination with PPOs requires more preparation and setup, but you can set it up like this.
Plan enough in advance
To use Product Page Optimizations effectively, you need to plan the app releases and think about the tests you will run in between. Prepare your testing assets on time so you can use the time between two app submissions.
Be careful with testing app icons
Testing app icons with PPOs is challenging and limited. And because you won’t know the traffic sources for your treatments, you might get false results. For instance, App Store Browse users typically convert worse than App Store Search users. If your treatments get a lot of Browse users (in cases your app gets featured), the results might look better than they would necessarily be.
Look at the audience sizes before implementing the results
We have already mentioned that PPOs need a decent amount of data to make test results significant and to declare a clear test winner. Many tests you will perform might need to reach more confidence, so you need to observe when thinking about results implementation.
Stick to the general testing rules
While there are many pieces of advice on how to approach your A/B tests, you should stick to the basic rules when using PPOs as well:
- Monitor your competitors and plan testing iterations based on market trends
- Pay attention to your current traffic sources and differentiate between them to know which traffic source might be the most relevant to your test results
- Focus on one localization or a few that are very similar to overcome the limitations of PPO analytics
Closing thoughts
Product Page Optimization is another great tool that you can use for your A/B testing. Together with Google Play Store listing experiments, they allow you to do native A/B testing that no other tools provide. As such, PPOs should be an integral part of your app store optimization and conversion rate improvements.
While many limitations come with PPOs, that doesn’t mean you shouldn’t use them. If you prepare properly, understand your testing goals and use other tools to overcome the limitations, you can get a lot of valuable insights from PPOs.
If you want to take your A/B testing to the next level, get in touch with App Radar’s ASO and app marketing team. Our daily job includes optimization of all sorts of App Store apps and we know how to use A/B testing tools to push app growth to the next level.
Latest Posts
iOS App Product Page Localization: How to Use it the Right Way to Improve ASO
Top 10 Most Downloaded Games in Google Play Store (July 2025 Update)
Google Play Store Listing Experiments: How to Run Native A/B testing for Android Apps for Free!
12 Best Mobile Measurement Partners (MMPs) to Consider for Your Mobile App Attribution in 2025
Related Posts
